Blog entry 1: Laser cutting
- Ngo Van Anh
- Nov 5, 2022
- 5 min read

Last semester wrapped up the first part of my chemical product design journey, the ideation and cardboard prototyping phase. Now we shall embark on a new journey, acquiring skills to make a functional prototype and eventually, a complete product.
The first lesson of Chemical Product Design and Development is learning laser cutting and passed the proficiency test, after which will grant us the rights to book and use the FabLab laser cutter whenever we want.
In this blog, I will walk through what we learned in the lesson, including:
The 4 important hazards associated to the operation of laser cutting machine and their respective safety control measures (administrative/engineering control).
2. The materials that can be cut and can’t be cut using laser cutting machine.
3. The steps including pictures on the operation of UNIVERSAL laser cutter, that consist of:
a. Starting the compressor, turning on the laser cutter machine and fume extractor.
b. Importing a .DXF file to coreldraw and modify the lines/fill for cutting and engraving.
c. Sending the coreldraw drawing to laser cutter software and setting the laser cutter power, speed, PPI in the software.
d. Starting the job on the laser cutter machine.
e. DOs and DONTs when there’s flame/fire on the material being cut.
And finally, my learning reflection.
So first of all, 4 important hazards/ risks and their respective safety control measures
Hazards | Safety Control Measure | Picture(s) to support explanation |
| If there is a need to check on the cutting, only take quick glances, avoid staring at the laser. |  |
2. The material being cut catch on fire | Small fires are normal and should subside within 1-2 seconds. If the fire does not put itself out within a few seconds, pause the cutting, open the lid of the machine and try to blow the fire out. If the fire is large and uncontrollable, take out the material and use a fire extinguisher to put out the fire. |  Small flashes of fire like this are normal and should put themselves out.  Bigger fires will require usage of a fire extinguisher. |
3. Laser cutter lens cracking | Ensure the lens is always clean before and after using the laser cutter. If the lens is dirty the laser beam can not focus properly and might crack the lens. Inform the teacher in charge if the lens is dirty. |  |
4. A lot of smoke is produced during cutting and does not clear | Ensure the fume extractor is on. If there is a lot of dense smoke, pause the cutting and wait for the fume extractor to clear the smoke. |  |
Secondly, there are materials that can and cannot be cut using our school laser cutter.
Materials that CAN be cut/ engraved
Name of material | Photo |
Wood up to 6mm thickness (PLywood, Natural wood, MDF) |  |
Acrylic up to 5mm thickness |  |
Cardboard |  |
Paper (Art cards and technical Boards) |  |
Materials that CANNOT be cut/engraved
Name of material | Photo |
Metal |  |
Plastics containing chlorine (PVC) |  |
Foam |  |
Thirdly, Operation procedure on the Universal laser cutter in FabLab
a. Starting the compressor, turning on the laser cutting machine and fume extractor.
Step and description | Photo |
On the right wall of the workspace, there are 2 switches for compressor and fume extractor. Flip the switches to on the equipment |  |
On the laser cutter using the on button on the control software on the laptop. | |
b. Importing a .DXF file to CorelDRAW and modify the lines/fill for cutting and engraving.
Step and description | Photo |
Import the file from Fusion to Corel Draw. On top left corner, click File -> Import -> Select the desired file -> Import |  |
Changing line width and fill colour. On bottom right corner, double click the icons to change the settings. The standard for lines and fill are as follow: - Vector cut: RGB Red, Hairline width - Engrave/ Vector Engrave: RGB Green, no line width as engraving is an area |   |
After changing the line and fill colours to the appropriate colour, the file can now be saved and sent to cut. | |
c. Sending the coreldraw drawing to laser cutter software and setting the laser cutter power, speed, PPI in the software.
Step and description | Photo |
On CorelDraw, select File -> Print |  |
In the Print settings, General tab, select the cogwheel icon next to Printer for further settings. |  |
In Universal’s Material settings, select LOAD for more settings |  |
Select presets to match the material type and thickness, then select OPEN |  |
The Universal Control Panel icon will be in the taskbar, click on it to open the control panel to control the printing. |  |
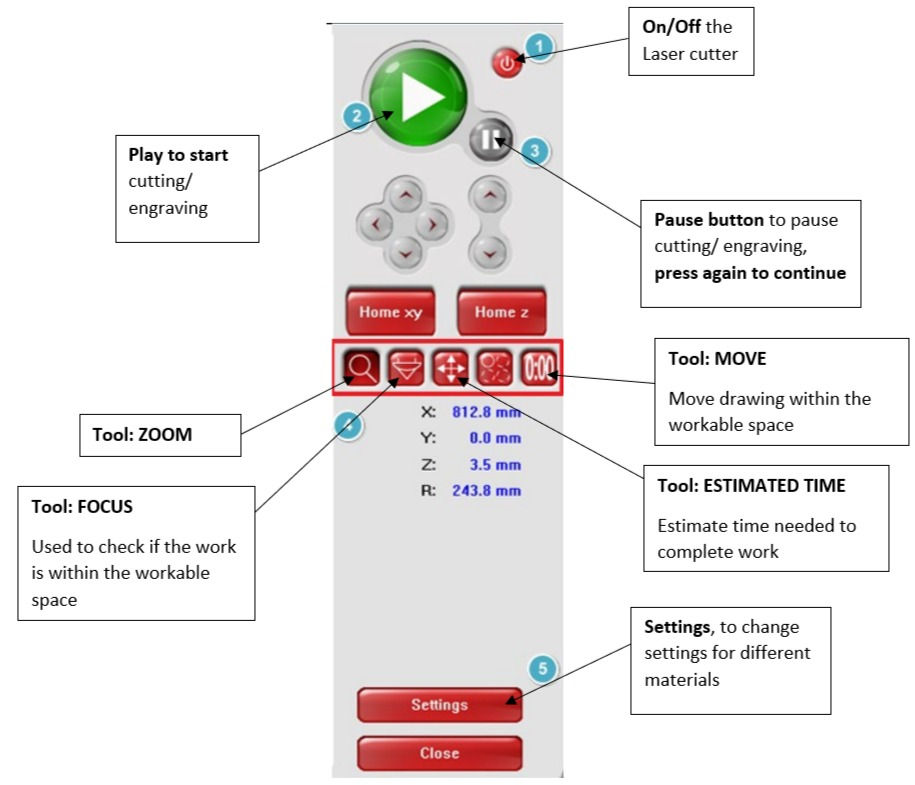
Guide to the Universal control panel
d. Starting the job on the laser cutter machine.
Step and description | Photo |
When all settings are done, close the lid of the Laser cutter |  |
Press the PLAY button on the Universal Control Panel or the physical button on the Laser cutter to start cutting. | |
e. DOs and DONTs when there’s flame/fire on the material being cut.
DOs / DONTs | Photo |
DO try to put out small fires on your own by pausing the cutting and blow the fire off. | |
DO inform the lecturer in charge if the fire get too big and assist in putting it out. |  |
DO know the location of the fire extinguisher in FabLab |  FabLab entrance |
DONT leave and tell no one |  |
Learning reflection
Like most, if not all, of my classmates, this is our first experience with laser cutting. Some of us might have seen a laser cutter before, but not much more than that. SO obviously we were quite shocked to hear that we are going to write our own SOPs for the laser cutter and go for a competency test the following week.
At first, we were stumped by this assignment. How can we write an SOP for operating a laser cutter when we haven't even been inside FabLab??? When we learned 3D printing, we were only required to write an SOP after we have finished our Egg Drop Challenge, at which point we have already used and familiar with Fusion360, Cura, and the 3D printers in W3, so writing an SOP was not much of a challenge.
Furthermore, me and a lot of my classmates were confused as to why we even need to write our own SOPs, as there is already a detailed guide on BrightSpace on the Universal laser cutter.
While writing my SOP, I constantly need to refer to the video on BrightSpace as well as the provided guide, to ensure that I included everything essential for the competency test. There are parts where I find that re-writing it my own way is much easier for me to refer to, for example on the part showing us the functions of the Universal Control Panel, the guide just have a picture of the control panel, with number labels on the buttons and a legend below, which I find to be a bit impractical when I need to refer to it fast during test or just during normal work. So I re-write that portion to have all the instructions in text boxes with arrows pointing to the respective button, as well as shorten the description of each Tool to just a few words each, so everything fits into one image, which to me is a lot easier to refer to.
From my previous experience with 3D printing, I always forget to do proper housekeeping after I finish using the machine, like forgetting to clean all the leftover filament pieces off the print base, forgetting to take out and keep the roll of filament into the dryer, etc. So I made sure this time when I write the SOP for laser cutter, I put all the housekeeping tasks down, separate them into points I can check off as I finish cutting.
Beside creating an SOP, I also learned several important concepts of laser cutting. First is the difference between vector and raster image. Before, I only know vector is the images you can scale as much as you want and it will keep its resolution, while raster images will become pixelated when scale up too much. I never really bother to look into why one image can scale and the other cannot. But actually, that is a really important thing to know when designing. During the lesson, I learned that the reason why vector images can scale is because the lines are saved as equations on a graph, and no matter how big or small is the graph, with the equations you can still plot smooth lines, which is why these images can scale. While raster images are the type of image we are more familiar with, pixels on a grid. So if we scale a raster image up, its resolution does not change and the pixels only get bigger, which result in the image being pixelated. Which is why generally we want a vector image file when importing into CorelDRAW to cut to ensure that even when we scale the design up the lines will stil be smooth.
Futhemore, I also learned about what materials can and cannot be cut using our FabLab laser cutter, as well as certain drawbacks when using different material. For example, paper, cardboard might easily catch fire so you need to be careful while cutting them. Plastics are generally okay but you need to avoid PVC as it as chlorine in its chemical formula, meaning upon being burned by the laser it will release toxic hydrogen chloride gas. Natural wood contain oils which may also caught fire, which is a safety risk we need to take note of when cutting wood. Metals cannot be cut with our laser cutter because our cutter is not designed for metal.
Finally, I learned about kerf, which is something you need to take note of when we cut parts that are meant to be fitted into each other. Kerf is the portion of material that is burned away by the laser during the cutting process. As the cut line has a certain width, albeit small, it still result in the final piece of cut material being slightly smaller than the dimensions of the design. This means if you design pieces to fit together perfectly, they most likely will only fit very loosely into each other as some material is burned off. So, when designing, I should make the pieces slightly smaller or slightly bigger than anticipated, to compensate for the kerf. How much I should compensate for depending on the line width selected.
My competency test turned out to be very quick and I passed easily (yayyy :D). As I have the entire instruction of the Universal Control Panel on a single page, I can very quickly refer to them. However, if I have had a chance to see the laser cutter, even if just for an hour, to inspect it and the surrounding setting more closely, I would have added some additional item to my SOP to make it more completed, as there are many details I missed, such as where the switches for the fume extractor and the compressor are or where the fire extinguisher is.
But nevertheless, I passed and learned a lot and I am quite confident now that I can operate the laser printer on my own. I'm looking forward to the next practical sessions of CPDD.


Comments